New Years is on the horizon. Do you have any resolutions for next year? Do you make resolutions? I've mostly given up on resolutions, as I rarely stick with them. Instead, I try to make changes or plans in my life as a situation or need comes up. But I've always liked the idea of new year's resolutions; a new beginning, new adventures and plans.
I also like new year's traditions. My mom always makes black eyed peas on new year's day. She says it brings good luck in the new year for those who eat them.
I fear I am going to have bad luck in Germany trying to find black eyed peas - make that, impossible-never-going-to-happen luck. So, I went out in search of something I can make to bring us luck in 2009.
On a cute little blog, which unfortunately seems now defunct, the chef made Black Beans and Rice (Moros y Cristianos). She also tells the history of the recipe: "Black beans and rice is a popular Cuban dish said to bring good luck when eaten on New Year's Day. In Spanish, the dish is called Moros y Cristianos or Christians & Moors, with the black beans representing the dark-skinned Moors and the white rice representing the lighter-skinned Christians." Not sure how that relates to good luck, but as long as it does, I'll go with it.
Turned out quite delicious! And I'm very happy to have my 2009 lucky recipe handy for January 1.
Wishing you all a safe, and happy New Years!
Black Beans and Rice
Adapted from How to Cook Everything by Mark Bittman, by Sugar Rush
2 tablespoons extra-virgin olive oil
1 medium onion, finely chopped
1 red or yellow bell pepper, stemmed, peeled if desired, and chopped
Salt and freshly ground pepper to taste
1 tablespoon minced garlic
3 cups drained cooked or canned black beans
1 cup chopped tomatoes (canned are fine; don't bother to drain), optional
1 cup bean cooking liquid, or chicken, beef or vegetable stock, or water
1/2 cup minced fresh parsley leaves
1 teaspoon cumin
1 teaspoon thyme
1/2 teaspoon crushed red chili peppers
1 bay leaf
1 tablespoon apple cider vinegar
Cooked Rice to serve
Place the oil in a large, deep skillet and turn the heat to medium. A minute later, add the onion and bell pepper. Season with salt and pepper and cook, stirring, until the pepper is soft, 8 to 10 minutes.
Stir in the garlic, the beans, the optional tomatoes, the spices and the liquid.
Turn the heat to medium-high and cook, stirring, until the beans are hot and most of the liquid is evaporated, 10 to 20 minutes.
Stir in most of the parsley and remove the bay leaf.
Arrange rice on a platter, in a ring if you like. Spoon the beans over the rice or into the center of the ring, or pass them separately. Garnish with the remaining parsley and serve.
In case you prefer a vegetarian black eyed pea recipe:
- Black Eyed Peas and Collard Greens, from Gluten-Free Bay
- Creole Black Eyed Peas, from FatFree Vegan Kitchen
- Black Eyed Peas, from Slashfood
Guten appetit!
Tuesday, December 30, 2008
Friday, December 26, 2008
Shrimp Étouffée
It's Christmas Eve (as I write this). Wow. Naturally, I'm not quite ready for the end of 2008. While I've seen and done a lot this year, I always feel like I've left opportunities on the table. New hobbies, a few personal to-dos, house organization, and naturally, some travel. On the other hand, we did manage to grab life by the kohonas and do some pretty cool things! Skied a world famous glacier in France, started a food blog, got some great biking in (Tour de France style - Tim, not me), visited with old friends and got to know some new friends, and finally made it to Berlin. We also had one very important, life changing accomplishment this year... our baby due in January. For that, and many more wonderful experiences, I will always appreciate and cherish 2008.
Since we are far away from family this year and are enjoying a very leisure and relaxing Christmas Eve, I have time to blog for Friday's post (after this, I will be wrapping Tim's presents). On such a special day, I feel like I should provide a special recipe.
Shrimp Étouffée is a recent discovery, and one that will be cooked for years to come! It's a powerhouse of flavors, and has nothing but goodness in it. Shrimp, vegetables, and rice. It sounds so simple, but is so wonderful.
Don't be deterred by the long list of ingredients (it's just a lot of spices, and you likely have almost everything in your kitchen), or the multi-step process. The prep and cooking go by very quickly, and every bit of effort is rewarded.
Wishing you and your family a glorious holiday!
Shrimp Étouffée
from Cooking Light
4 cups vegetable broth
1 teaspoon dried thyme
1 teaspoon dried basil
1 bay leaf
1/3 cup butter, divided
1/2 cup all-purpose flour (about 2 1/4 ounces)
Cooking spray
1 1/2 cups chopped onion
2/3 cup diced celery
1/2 cup chopped red bell pepper
1/2 cup chopped green bell pepper (I used 1 red bell pepper only, to avoid waste)
3/4 cup water
1/4 cup tomato paste
1 tablespoon salt-free Cajun seasoning (Very important that it's salt-free, or you risk over-salting. You can always add more, but you can't take it back)
1 1/2 teaspoons minced garlic
1/4 teaspoon salt
1/4 teaspoon black pepper
1/4 teaspoon ground red pepper
1 teaspoon Worcestershire sauce
1/2 cup chopped green onions (I did not use any green onions, and turned out great)
1/2 cup chopped fresh flat-leaf parsley, divided (I also didn't have parsley)
1 pound medium shrimp, peeled and deveined (about 30 shrimp)
4 cups hot cooked long-grain rice
Combine first 4 ingredients in a small saucepan over medium heat; bring to a simmer. Cover and remove from heat.
Melt 1/4 cup butter in a medium saucepan over medium heat. Lightly spoon flour into a dry measuring cup; level with a knife. Add flour to pan; cook 8 minutes or until very brown, stirring constantly with a whisk. Remove from heat. Add 1 cup broth mixture to pan; stir with a whisk until smooth. Add remaining 3 cups broth mixture, stirring with a whisk until smooth; set aside.
Melt remaining 1 tablespoon plus 1 teaspoon butter in a large Dutch oven (I used a large regular pot) coated with cooking spray over medium-high heat. Add 1 1/2 cups onion, celery, and bell peppers to pan; cook 10 minutes or until vegetables are tender and onion is golden brown, stirring occasionally. Stir in 3/4 cup water, scraping pan to loosen browned bits. Add tomato paste, Cajun seasoning, garlic, salt, black pepper, and red pepper to onion mixture; cook 1 minute, stirring constantly. Add reserved broth-flour mixture and Worcestershire sauce to pan, stirring well to combine; bring to a simmer. Cook 10 minutes, stirring occasionally. Add green onions, 1/4 cup parsley, and shrimp; cook 3 minutes or until shrimp are done. Discard bay leaf. Serve over rice. Sprinkle each serving with 2 teaspoons remaining parsley, if desired.
More cajun inspired dishes:
- Shrimp Po'Boy Sandwich, from Nola Cuisine (this is definitely on my list to-make!)
- Fried Catfish and Hushpuppies, from Nola Cuisine
- Chickpea Gumbo, from FatFree Vegan Recipes
- Cajun Quiche in a Rice Crust, from Cooking Light (omit the sausage, or use a veggie substitute)
Guten appetit!
Tuesday, December 23, 2008
Cherry Topping (or pie filling)
For dessert, I would always choose a fruit option (pie, cobbler, etc) over cake (chocolate, cheesecake, etc). So, if I am going to have cheesecake (twist my arm. go ahead, twist it. oh, ok, I'll have a slice!), it most definitely will have a fruit topping. And if I'm baking said cheesecake, I'm going to whip up my own fruit topping, avoiding the overly gooey store bought kind.
Since Tammy had such a winning recipe for cheesecake, I wanted to try her cherry topping. Mine looked significantly different than hers (comparing pictures). Hers had more of the store bought look, with a thicker consistency and dark red color. Mine stayed light pink in color and fairly runny. I was using corn starch to thicken the sauce, and was worried about adding too much (see recipe notes below). Using jel would be easier, but cornstarch is more common to have in the house and was my preference to use.
No matter the color or consistency, the taste was delicious! Those who took a small amount of sauce to start, asked for more. And there's no mistaking, homemade is waaayyyyyy better than store bought.
Cherry Topping/Pie Filling
from Tammy's Recipes
3 cups pitted sour cherries
1 1/2 cups sugar
clear jel or cornstarch, for thickening (I used 2 teaspoons cornstarch, but will increase it to 3 next time)
Makes 3 cups.
Combine fruit and sugar in a pan and stir together. Bring to a boil.
Mix cornstarch or clear jel* with some cold water or reserved cherry juice (about 1/3 cup of each), whisking to remove lumps.
*Cornstarch thickens, and will continue to become thicker as your mixture cools. Do not make it as thick when hot as you would like it to be when it has cooled, or it will be too thick. Clear jel, however, is the same thickness hot as it is cold. We prefer clear jel for thickening pie filling, as it is easier to see the consistency, and the pies don't tend to run over in the oven as easily.
When cherries are boiling, add thickening while stirring constantly to prevent lumps. Add enough thickening to make the consistency you desire. We like our pies fairly thick, but cheesecake topping thinner.
If you're making a pie: Pour into pie crusts (unbaked pastry). Bake pies at 425 degrees F for about 30 minutes or until browned.
Other fruit topping recipes for cheesecake:
- Blackberry Sauce, from Joy the Baker
- Blueberry Sauce, from Annie's Eats
- Mixed Berry Sauce, from Something Sweet
- Plum and Strawberry Sauce, from Wannabetvchef.blog
Guten appetit!
Friday, December 19, 2008
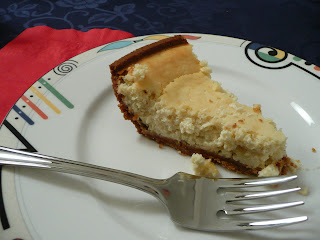
Classic Cheesecake
I hope everyone is enjoying their holiday, and celebrating with friends & family all around you. Words can never describe the magic of this season! I love it.
As a holiday recipe, I'd like to share with you a very delightful treat: Cheesecake.
You all know, my last attempt at cheesecake turned out OK, but not great. I decided to go back to the basics and make a really great classic cheesecake. My sister, in particular, loves cheesecake. So I also thought I should have a solid recipe in my arsenal for her birthdays, special occasions, etc.
This recipe is definitely my new go-to cheesecake! Was very easy, tasted creamy and rich, was dense, and cooked without any hassle (no water baths, etc). If a cheesecake recipe turns out this perfect on your first try, it's got to be good.
My only complaint would be that it made a very thin pie. I would rather have a thicker cheesecake, and will use a deep dish pie plate next time. Problem easily solved!
If not a cheesecake, what dessert will you make/have you made for your December holiday gatherings? Please share.
Happy, happy to all of you!
Classic Cheesecake
from Tammy's Recipes
12 ounces cream cheese, softened
4 ounces sour cream
3/4 cup sugar
2 eggs
1 teaspoon vanilla
one 9-inch graham cracker crust*
In a large bowl, beat cream cheese, sour cream, sugar, eggs, and vanilla until smooth. (seriously, that's all there is to it!)
Pour into crust and bake for 45 minutes at 350 degrees. Remove from the oven and let cool.
Chill for at least 4 hours or up to two days before serving. Top with fruit topping (easy and delicious cherry topping recipe coming up on Tuesday), whipped cream, or just eat plain!
* You can make your own crust by combining 1 cup graham cracker crumbs, 2 tablespoons sugar, and 4 tablespoons melted butter. Press into the bottom of your dish and fill as directed.
Mmm, mmm, cheesecake:
- Blueberry Cheesecake, from The Blog Chef
- Vegan Eggnog Cheesecake, from Fatfree Vegan Kitchen
- No Bake Cheesecake, from Closet Cooking
- Chocolate Pecan Cheesecake Bars, from Bake or Break
Guten appetit!
Tuesday, December 16, 2008
Soy Ginger Salad Dressing
Are you a salad fanatic? Or you think you could be, if you found the right dressing? (I fall into the latter category)
This is a delicious winter dressing, that reinvigorated my zest for salads. Yes, 'zest' I tell you! With maybe a bit of zing thrown in too. I really, really liked it.
Anyway, whether you want to zip up your weeknight salads, or you're planning to serve salad at your holiday dinner party, this dressing will be a hit!
As an added bonus for wintertime, the recipe includes ginger. Did you know that ginger is used often in Japanese cooking/teas during the winter, due to it's warming effects on the body? And, ginger happens to be very, very good for you. It helps with circulation, calming an upset stomach, arthritis and digestion (to name only a few benefits). But, ginger is not the reason to make this dressing. You should make it because it's delicious!
Pairs well with both leafy salads and pasta salad.
Soy Ginger Salad Dressing
recipe came from a friend, unknown original source
3 cloves garlic, minced
2 tablespoons minced fresh ginger root
3/4 cup olive oil
1/3 cup rice vinegar
1/2 cup soy sauce
3 tablespoons honey
1/4 cup water
Combine all ingredients in a container that you can seal, and shake really well. Done.
Guten appetit!
Friday, December 12, 2008
Monkey Bread
Oh, sweet goodness... where have you been all my life?! From the second I saw the recipe and thought about this bread, I knew I was going to love it. And I did. I loved it the morning we made it, then again that afternoon and evening. And I helped myself to more the following day. I propose a name change to 'crack bread'. I've never felt so addicted to a food - I want it again, now. (Beware of denying pregnant women food)
Luckily, we made two batches of this delicious recipe. Otherwise, there could have been fierce battles over the sharing of 'my bread'. Not to make you think I'm a ginormous piggy, we only made two breads because we thought our first batch was a botch - the dough seemed really runny, and it was taking a long time to rise. But as soon as we started on the second batch, our first began to spring to life and so we had two monkey breads to feast on!
If you are hosting a brunch, shower, or holiday breakfast, please consider making this bread (and inviting me over!). Pretty please! Yes, I'm begging.
The bread is cinnamon gooey goodness, with a nice, fluffy doughy texture. Like cinnamon rolls, only better. I would rate the recipe difficulty as 'medium' (Only because of its time requirements, and multi-step process. But the recipe itself is a surprisingly easy, step-by-step process and worth every second of effort).
TIP: If you want to speed your prep time along, after putting the dough in a bowl and covering it with saran wrap to rise, heat your oven to 300 degrees and open the door. Place the bowl on the oven door, so it catches the heat from the oven. OR, you can turn on your oven to 400 degrees, after heated, turn it off. Place a cookie sheet of hot water on the bottom rack and your bowl with dough on the rack above, covered with a dry dishtowel. Shut the oven. Either way, your dough will rise twice as fast!
Monkey Bread
from my friend Sonya
2 tablespoons unsalted butter, softened
For the dough:
3/8 cup warm milk (about 110 degrees F)
1/2 cup warm water (about 110 degrees F)
2 tablespoons unsalted butter, melted
1/4 cup granulated sugar
1 egg, lightly beaten
1 package rapid-rise yeast
3 1/4 cups all-purpose flour, plus more for dusting
2 teaspoons salt
For the sugar coating:
1 cup firmly packed light brown sugar
2 teaspoons ground cinnamon
8 tablespoons unsalted butter, melted
For the glaze:
4 tablespoons unsalted butter
1/2 cup firmly packed light brown sugar
1/4 cup maple syrup
1 teaspoon ground cinnamon
1 tablespoon water
Have all the ingredients at room temperature. Butter the monkey bread baking mold (a 10 inch round bundt pan) with the 2 tablespoons softened butter.
To make the dough, in a bowl, whisk together the milk, water, melted butter, granulated sugar, egg and yeast.
In the bowl of an electric mixer fitted with the dough hook, combine the flour and salt and beat on low speed just until combined. Slowly add the milk mixture and beat until the dough comes together, 1 to 2 minutes. Increase the speed to medium and beat until the dough is sshiny and smooth, 5 to 6 minutes.
Turn the dough out onto a lightly floured surface and knead until smooth, about 1 minute. Form the dough into a ball. Coat the inside of a large bowl with nonstick cooking spray, place the dough in the bowl and coat the surface of the dough with cooking spray. Cover the bowl with plastic wrap and let stand in a warm place until doubled in bulk, about 1 hour (see Tip).
Meanwhile, prepare the sugar coating. In a bowl, stir together the brown sugar and cinnamon. Put the melted butter in another bowl. Set aside.
Turn the dough out onto a floured surface and shape into an 8-inch square. Cut the dough into 6 equal strips, then cut each piece crosswise into 8 pieces to form a total of 48 pieces. Roll each piece into a ball, dip into the melted butter and roll in the brown sugar-cinnamon mixture, coating well. Stack the balls in the prepared baking pan. Cover with plastic wrap and let rise in a warm place for 30-45 minutes. Do not let the dough rise over the top of the pan.
Position a rack in the lower third of an oven. Place a piece of aluminum foil on the rack to catch any drips during baking. Preheat oven to 350 degrees F.
Remove the plastic wrap and place pan in the oven. Bake 30 minutes, or until cake is slightly crunchy on top.
While the bread is baking, combine all glaze ingredients and whisk until smooth.
When bread is done, remove from oven. Place a plate on top of bundt pan (upside down) and flip so that cake falls out onto plate. Drizzle the glaze on top (you may not want to use all of the glaze, depending on how sweet you want it). Serve warm.
Serves 12-15 people.
Today, I have no other recipes to offer in place of this Monkey Bread. Nothing can compare. (pitter patter, goes my heart. growl growl, goes my stomach!)
Guten appetit!
Tuesday, December 9, 2008
Rocky Road Granola Clusters - Fun homemade gift
Today is going to be a short post. We have wonderful guests visiting us, and I was able to finish these neighbor holiday gifts just before their arrival. But now that they're here, we want to go out, not be inside on the computer.
This is a tribute to the season, for anyone looking for something wonderful and easy to make homemade, as a low-cost, delicious, made with love gift for family, friends or neighbors during Advent. How delicious are they? Tim liked these so much, he told me I was never allowed to make them again, they're too dangerous to have in the house. I actually thought they were a bit too sweet, but I err on the lower end of the sweet spectrum. For the holidays, I think most people like to indulge.
This would also be a fun project to do with little bakers in the house. All that's required is mixing and spooning the mix onto baking sheets to harden.
My gift to the neighbors...
Rocky Road Granola Clusters
from Safeway
1 (16-oz.) package chocolate candy coating, chopped (I used chocolate chips, and they worked fine. But they do not melt easily in the microwave, and if not watched and strirred, can burn)
2 tablespoons shortening
1/4 cup creamy peanut butter
2 to 3 cups coarsely chopped granola bars
3/4 cup sesame sticks or thin pretzels
3 tablespoons slivered almonds, toasted (I forgot to add these, and was still great!)
1 cup miniature marshmallows
12 caramels, chopped
Combine chocolate coating and shortening in a large microwave-safe bowl; cover loosely with heavy-duty plastic wrap. Microwave at HIGH 11/2 minutes or until melted, stirring once. Stir in peanut butter. Let stand 2 minutes. Stir in granola bars, sesame sticks, and almonds. Stir in marshmallows and caramels last so they don't melt. Drop by rounded tablespoonfuls onto parchment or wax paper. Let clusters stand until firm.
Easy peasy.
Guten appetit!
Friday, December 5, 2008
Hearty, Healthy Lentil Stew
This is one of my favorite winter meals. Complete comfort food.
Requires a bit of time (to cook the lentils and rice), but the preparation and work involved is very minimal. It's simple, packed with flavor, warm and healthy. Bring on the snow! I'll be tucked away on the couch, resting my big pregnant belly, watching a movie and eating lentil stew with fresh, crusty whole wheat bread. (sigh)
If you're a skier/snow-shoer, consider bringing this in your thermos instead of chili. Does a similar job, and would be a nice change.
A toast: To warm food, and cold days!
Lentil Stew
from Cooking Light
1 tablespoon olive oil
1 1/4 cups chopped onion
1 cup chopped celery
3/4 cup chopped carrot
1 garlic clove, sliced
4 cups vegetable broth
1 cup water
1 (28-ounce) can crushed tomatoes, undrained
1 cup dried lentils
3/4 cup instant brown rice
1/2 teaspoon crushed red pepper
1/4 teaspoon salt
1/4 teaspoon black pepper
Heat oil in a small Dutch oven over medium-high heat.
Add onion, celery, carrot, and garlic to pan; sauté 8 minutes or until tender.
Add broth, water, and tomatoes; bring to a boil.
Stir in lentils; simmer 25 minutes, stirring occasionally.
Stir in rice; simmer 20 minutes, stirring occasionally.
Stir in red pepper, salt, and black pepper.
More lentil soup recipes:
- Syrian Vegetarian Red Lentil Soup, from Herbivoracious
- Lentil and Escarole Soup, from Farmgirl Fare (use Vegetable Broth)
- Moroccan Lentil Soup, from A Year in Crockpotting
Guten appetit!
Labels:
beans,
favorites,
freezer friendly,
main dishes,
rice/couscous,
soup
Tuesday, December 2, 2008
Black Bean and Spinach Lasagna
Have a lot going on this holiday season?? I love it, but it can be exhausting.
You sail through Halloween because it's the first; you/the kids dress up, everyone's excited, fall has arrived, etc, etc. Then Thanksgiving comes around and it's a family chaos bonanza, and you love it too because of the traditions, having everyone gather, and eating too much (mmm, pumpkin pie!). Then a few days later, barely recovered from Thanksgiving, December hits and you're in a shopping frenzy, going to holiday parties, friend/family open houses, and before you know it... cooking is a distant memory and a dinner of snickers and apple seems OK.
STOP. I have a great solution!
Black Bean and Spinach Lasagna. Yes, it's your solution. Why? Because it's delicious, it makes a ton, and freezes great. Make the recipe and cook half for dinner this week, and put the other half in your freezer for 2 weeks from now, when you are not even remotely going to want to cook OR have time to cook. A half-recipe will easily feed 3-4 people with a side (try garlic bread, or simple salad).
I'm wishing you fun, laughter and energy (given to your body through eating well!) this holiday season. Enjoy these moments.
Black Bean and Spinach Lasagne
from Cooking Light
2 large eggs, lightly beaten
1 (15-ounce) container ricotta cheese
1 (10-ounce) package frozen chopped spinach, thawed and well drained
1/4 cup chopped fresh cilantro (optional, I omitted this as Tim doesn't like cilantro)
1/2 teaspoon salt
4 cups (16 ounces) shredded Monterey Jack cheese with peppers (I used a mixed pre-shredded bag of cheddar and emmentaler), divided
2 (16-ounce) cans black beans, rinsed and drained
1 (2-pound, 13-ounce) jar pasta sauce (try the Smokey Marinara sauce, tastes great!)
1/2 teaspoon ground cumin
9 precooked lasagna noodles
Garnish: chopped fresh cilantro (optional)
Stir together first 5 ingredients and 1 cup shredded cheese; set aside.
Mash beans with a potato masher or fork in a large bowl (* VERY important to do this first, as I dumped in the pasta sauce too quickly and found it hard to mash the beans after); stir in pasta sauce and cumin.
Spread one-third of bean mixture on bottom of a lightly greased 13x9 inch baking dish (use 2 smaller pans if you are going to divide the lasagna and freeze half).
Layer with 3 noodles, half of spinach mixture, and 1 cup cheese; repeat layers.
When you are close to the end: spread with one-third bean mixture, top with remaining 3 noodles and remaining bean mixture.
Bake, covered, at 350 for 1 hour; uncover and top with remaining cheese. Bake 5 more minutes or until cheese melts. Garnish, if desired.
Lasagna, lasagna and more lasagna:
- Roast Vegetable Lasagne, from Exclusively Food
- Roasted Squash-Onion Lasagna, from One Hot Stove
- Fennel and Tomato Lasagna, from Mostly Eating
- 3 Cheese Pesto Vegetable Lasagna, from Ms. Adventures in Italy
Guten appetit!
Labels:
beans,
casserole,
freezer friendly,
main dishes,
pasta
Subscribe to:
Posts (Atom)